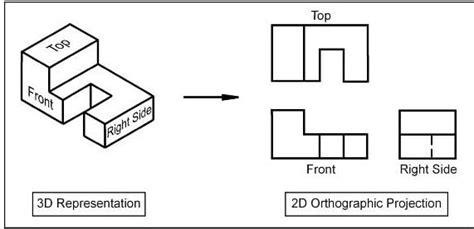
Understanding the nuances of technical drawings is essential for architects, engineers, and designers. Two fundamental concepts in technical drawing are orthographic and isometric projections. These techniques are used to represent three-dimensional objects in a two-dimensional format, making it easier to visualize and communicate design ideas. However, they differ significantly in their approach, application, and visualization.
What is Orthographic Projection?
Orthographic projection is a technique used to represent a 3D object in 2D using multiple views, typically the front, top, and side views. This method involves projecting the object's features onto a plane, creating a flat representation of the object's shape and dimensions. Orthographic projections are widely used in architecture, engineering, and product design to create detailed, accurate drawings of objects and systems.

Key Characteristics of Orthographic Projection
- Uses multiple views to represent a 3D object
- Each view is a 2D representation of the object from a specific angle
- Views are typically aligned with each other to create a coherent representation
- Scaling and dimensioning are crucial to ensure accuracy
What is Isometric Projection?
Isometric projection is a technique used to represent a 3D object in 2D using a single view, which is a scaled-down representation of the object's dimensions. This method involves projecting the object's features onto a plane, creating a 2D image that retains the object's proportions and angles. Isometric projections are commonly used in technical drawing, architecture, and engineering to create quick, intuitive drawings of objects and systems.

Key Characteristics of Isometric Projection
- Uses a single view to represent a 3D object
- The view is a scaled-down representation of the object's dimensions
- Angles and proportions are retained to create a realistic representation
- Less detailed than orthographic projections, but more intuitive and easier to create
Key Differences between Orthographic and Isometric Projections
While both techniques are used to represent 3D objects in 2D, there are significant differences between orthographic and isometric projections. The main differences lie in their approach, application, and visualization.
- Approach: Orthographic projection uses multiple views to represent an object, while isometric projection uses a single view.
- Application: Orthographic projections are used for detailed, accurate drawings, while isometric projections are used for quick, intuitive drawings.
- Visualization: Orthographic projections provide a more detailed and accurate representation of an object, while isometric projections provide a more intuitive and easier-to-understand representation.

Practical Applications of Orthographic and Isometric Projections
Both orthographic and isometric projections have practical applications in various fields, including architecture, engineering, and product design.
- Architecture: Orthographic projections are used to create detailed drawings of buildings and structures, while isometric projections are used to create quick, intuitive drawings of building layouts and designs.
- Engineering: Orthographic projections are used to create detailed drawings of mechanical systems and components, while isometric projections are used to create quick, intuitive drawings of system layouts and designs.
- Product Design: Orthographic projections are used to create detailed drawings of products and components, while isometric projections are used to create quick, intuitive drawings of product designs and layouts.

Conclusion
In conclusion, orthographic and isometric projections are two fundamental techniques used in technical drawing to represent 3D objects in 2D. While both techniques have their strengths and weaknesses, they are essential tools for architects, engineers, and designers to communicate design ideas and create detailed, accurate drawings. By understanding the key differences and practical applications of orthographic and isometric projections, designers and engineers can choose the best technique for their specific needs and create effective, intuitive drawings that facilitate communication and collaboration.


What is the main difference between orthographic and isometric projections?
+The main difference between orthographic and isometric projections is the approach used to represent 3D objects in 2D. Orthographic projections use multiple views, while isometric projections use a single view.
What are the practical applications of orthographic projections?
+Orthographic projections are used in architecture, engineering, and product design to create detailed, accurate drawings of objects and systems.
What are the advantages of using isometric projections?
+Isometric projections provide a quick, intuitive way to represent 3D objects in 2D, making them ideal for creating quick sketches and designs.
