Are you tired of using low-quality printable materials for your DTF (Direct-to-Film) transfers? Do you struggle with achieving perfect results every time? Look no further! In this comprehensive guide, we will walk you through the step-by-step process of preparing and applying DTF transfers to ensure professional-looking results.
Understanding DTF Transfers
Before we dive into the application instructions, it's essential to understand what DTF transfers are and how they work. DTF transfers are a type of heat transfer that allows you to print high-quality images onto various fabrics, such as t-shirts, hoodies, and bags. The process involves printing the design onto a special film, which is then applied to the fabric using heat and pressure.

Preparing Your DTF Transfer
To achieve perfect results, it's crucial to prepare your DTF transfer correctly. Here are the steps to follow:
- Design and Print: Design your image using a software like Adobe Illustrator or Photoshop. Print the design onto the DTF film using a high-quality printer.
- Cut Out the Design: Cut out the design from the DTF film, leaving a small margin around the edges.
- Weed the Excess: Remove the excess film from the design, leaving only the printed image.

Applying the DTF Transfer
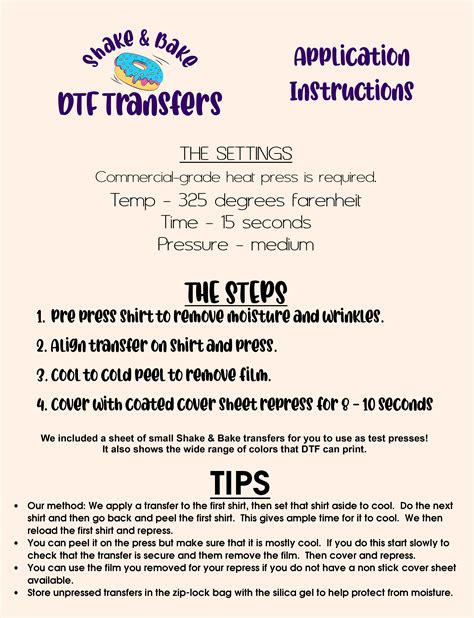
Now that your DTF transfer is prepared, it's time to apply it to the fabric. Follow these steps:
- Preheat the Heat Press: Preheat the heat press to the recommended temperature (usually around 300°F).
- Place the Fabric: Place the fabric on the heat press, ensuring it's smooth and wrinkle-free.
- Apply the Transfer: Place the DTF transfer on top of the fabric, aligning it with the center of the heat press.
- Apply Heat and Pressure: Close the heat press and apply heat and pressure for the recommended time (usually around 10-15 seconds).

Tips and Tricks for Perfect Results
To achieve perfect results every time, follow these tips and tricks:
- Use High-Quality Materials: Use high-quality DTF film and fabric to ensure professional-looking results.
- Adjust the Heat Press: Adjust the heat press temperature and pressure according to the fabric type and thickness.
- Avoid Over-Heating: Avoid over-heating the transfer, as it can cause the image to distort or peel off.
- Test the Transfer: Test the transfer on a small area of the fabric before applying it to the entire design.

Common Mistakes to Avoid
When applying DTF transfers, there are common mistakes to avoid. Here are some of the most common mistakes:
- Incorrect Temperature: Using the wrong temperature can cause the image to distort or peel off.
- Insufficient Pressure: Applying insufficient pressure can cause the transfer to lift off the fabric.
- Over-Heating: Over-heating the transfer can cause the image to distort or peel off.

Conclusion
Achieving perfect results with DTF transfers requires attention to detail and following the correct application instructions. By understanding the process, preparing your transfer correctly, and applying it to the fabric with the right temperature and pressure, you can achieve professional-looking results every time. Remember to use high-quality materials, adjust the heat press according to the fabric type, and avoid over-heating the transfer.


What is the recommended temperature for applying DTF transfers?
+The recommended temperature for applying DTF transfers is around 300°F (150°C).
How long should I apply heat and pressure to the transfer?
+Apply heat and pressure for around 10-15 seconds, depending on the fabric type and thickness.
What are common mistakes to avoid when applying DTF transfers?
+Common mistakes to avoid include using the wrong temperature, applying insufficient pressure, and over-heating the transfer.
