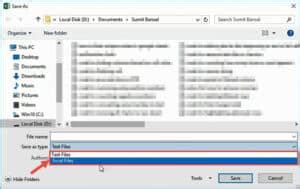
The ability to save files is a crucial aspect of many applications. In programming, this can be achieved through the use of various methods and functions. One such method is Application.GetSaveAsFilename, which is commonly used in Visual Basic for Applications (VBA) to prompt the user to select a location and filename to save a file.
In this article, we will explore five ways to use Application.GetSaveAsFilename in VBA, along with examples and explanations to help you understand its usage and benefits.
What is Application.GetSaveAsFilename?
Application.GetSaveAsFilename is a method in VBA that displays the Save As dialog box, allowing the user to select a location and filename to save a file. This method returns the path and filename selected by the user as a string.

1. Basic Usage of Application.GetSaveAsFilename
The basic syntax of Application.GetSaveAsFilename is as follows:
filename = Application.GetSaveAsFilename(InitialFilename, FileFilter, Title)
filenameis the variable that stores the path and filename selected by the user.InitialFilenameis the initial filename that appears in the Save As dialog box.FileFilteris the file filter that determines the types of files displayed in the Save As dialog box.Titleis the title of the Save As dialog box.
Here is an example of using Application.GetSaveAsFilename:
Sub SaveFile()
    Dim filename As Variant
    filename = Application.GetSaveAsFilename(InitialFilename:="example", FileFilter:="Text Files (*.txt), *.txt", Title:="Save File")
    If filename = False Then
        MsgBox "No file selected"
    Else
        MsgBox "File saved as " & filename
    End If
End Sub
In this example, the Save As dialog box is displayed with an initial filename of "example" and a file filter that only shows text files. The title of the dialog box is set to "Save File".
Handling Cancel Button
As shown in the example above, it's essential to handle the cancel button in the Save As dialog box. If the user clicks the cancel button, Application.GetSaveAsFilename returns False. Therefore, you should always check if the returned value is False before attempting to use the filename.
2. Customizing the File Filter
The file filter is a crucial aspect of the Save As dialog box, as it determines the types of files displayed to the user. You can customize the file filter by specifying multiple file types and descriptions.
Here is an example of customizing the file filter:
Sub SaveFile()
    Dim filename As Variant
    filename = Application.GetSaveAsFilename(InitialFilename:="example", FileFilter:="Text Files (*.txt), *.txt, Word Documents (*.docx), *.docx", Title:="Save File")
    If filename = False Then
        MsgBox "No file selected"
    Else
        MsgBox "File saved as " & filename
    End If
End Sub
In this example, the file filter is set to display both text files and Word documents.
3. Changing the Initial Filename
The initial filename is the default filename that appears in the Save As dialog box. You can change the initial filename by passing a different value to the InitialFilename parameter.
Here is an example of changing the initial filename:
Sub SaveFile()
    Dim filename As Variant
    filename = Application.GetSaveAsFilename(InitialFilename:="example2", FileFilter:="Text Files (*.txt), *.txt", Title:="Save File")
    If filename = False Then
        MsgBox "No file selected"
    Else
        MsgBox "File saved as " & filename
    End If
End Sub
In this example, the initial filename is changed to "example2".
4. Modifying the Title of the Save As Dialog Box
The title of the Save As dialog box can be modified by passing a different value to the Title parameter.
Here is an example of modifying the title:
Sub SaveFile()
    Dim filename As Variant
    filename = Application.GetSaveAsFilename(InitialFilename:="example", FileFilter:="Text Files (*.txt), *.txt", Title:="Save Your File")
    If filename = False Then
        MsgBox "No file selected"
    Else
        MsgBox "File saved as " & filename
    End If
End Sub
In this example, the title of the Save As dialog box is changed to "Save Your File".
5. Error Handling
Error handling is essential when using Application.GetSaveAsFilename, as errors can occur if the user selects an invalid filename or location.
Here is an example of error handling:
Sub SaveFile()
    Dim filename As Variant
    On Error GoTo ErrorHandler
    filename = Application.GetSaveAsFilename(InitialFilename:="example", FileFilter:="Text Files (*.txt), *.txt", Title:="Save File")
    If filename = False Then
        MsgBox "No file selected"
    Else
        MsgBox "File saved as " & filename
    End If
    Exit Sub
ErrorHandler:
    MsgBox "An error occurred: " & Err.Description
End Sub
In this example, error handling is implemented using the On Error statement, which redirects the code to the ErrorHandler label if an error occurs.


Conclusion
Application.GetSaveAsFilename is a powerful method in VBA that allows users to select a location and filename to save a file. By customizing the file filter, initial filename, and title, you can tailor the Save As dialog box to your specific needs. Additionally, error handling is essential to ensure that your code can handle any errors that may occur. By following the examples and guidelines outlined in this article, you can effectively use Application.GetSaveAsFilename in your VBA projects.
We hope this article has provided you with valuable insights into using Application.GetSaveAsFilename. If you have any questions or need further clarification, please don't hesitate to ask. Share your thoughts and experiences with us in the comments section below.
What is Application.GetSaveAsFilename?
+Application.GetSaveAsFilename is a method in VBA that displays the Save As dialog box, allowing the user to select a location and filename to save a file.
How do I customize the file filter in Application.GetSaveAsFilename?
+You can customize the file filter by specifying multiple file types and descriptions in the FileFilter parameter.
What happens if the user clicks the cancel button in the Save As dialog box?
+If the user clicks the cancel button, Application.GetSaveAsFilename returns False.
